With the fast development of technology, videos have become a popular method to take a record and display moments that are captured.
Popular screen recording and screen capture software like Snagit has become the talk of the web. Snagit has screen capture that has unique features like capturing all the images from a website and has some basic editing tools, like annotations while recording and capturing images such as special effects, crop stamp, resizes, and more.
Though it’s a great software for taking screenshots and recording screen activity, it doesn’t come cheap. Snagit is not a free screenshot software that’s why a lot of users are looking for a free Snagit Alternative tool to capture screen activity. If you just need a tool to take a screenshot simply, Snagit seems a bit overwhelming for its settings.
Introducing the best Snagit alternative none other than VideoPower GREEN or ZEUS a free Snagit alternative for Windows PC software that comes with screen recorder features that record screen activity in multiple ways possible with its various capturing modes. Useful functions included are the annotating tool and audio recording tool, which are important in improving your video clips.
In this article, we are going to teach you how to take a screenshot using this best free Snagit alternative software. Just click the DOWNLOAD button below to try this software for free!
ZEUS can do what VideoPower series can do and more with an almost similar interface.
Check out NOW! Start easier with more affordable prices!
How to Take a Screenshot Using VideoPower GREEN
Follow the step by step guide below on how to use the free Snagit alternative for Windows 10 called VideoPower GREEN for capturing screen activities.
Step 1: Open the “Screenshot” Section

Launch the software and click the “Screenshot” tab on the interface.
Step 2: Select a Region to Capture
Select an area or region on the screen that you want to take a screenshot of. You can hold and drag your mouse to the part of your screen that you want to save as an image.
Step 3: Edit and Save Screenshot
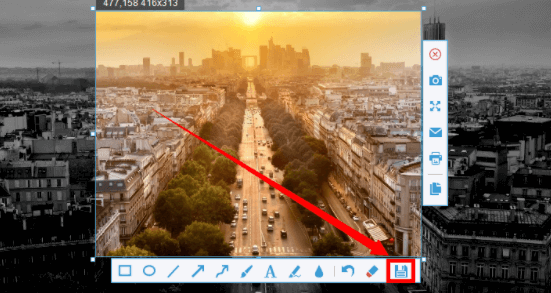
Release the mouse if you choose a specific area that you want to take a screenshot, a menu will appear where you will choose to copy the image to clipboard, edit the image, or save it.
You can also add a line, arrows, shape, text, highlight, blur, and many more before saving your captured screenshot.
when you are ready to save a screenshot, click the save button to choose a media format and storage location folder
Guide on How to Record Screen Activities
Step 1: Prepare Sound Source and Recording Mode
Follow the step by step guide shown below on how to record screen on your computer using VideoPower GREEN, an alternative to Snagit.
1.1 Set the Sound Source
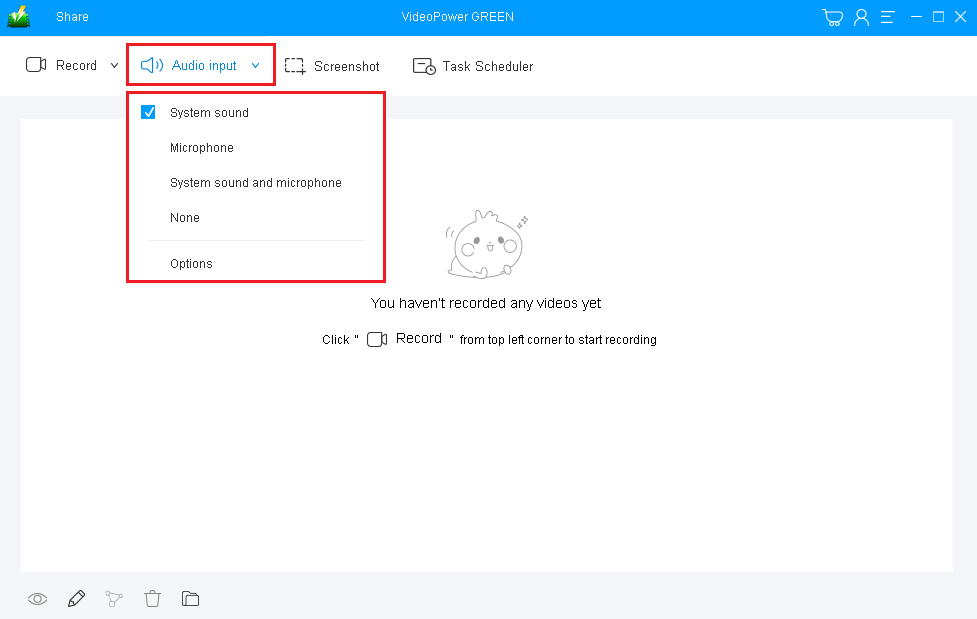
This powerful video recording tool enables users to set their preferred sound source before recording. User can choose among “System sound,” Microphone”, “System sound and Microphone or “None”
Microphone- The software records any sound that can be picked up by the microphone
System sound- The software records any sound made by the running programs themselves or videos played on PC
1.2 Choose a Recording Mode

Users can set their own recorded mode for recording from the software that means they can set in what area on screen they want to save as a video recording file.
Users can choose among “Region”,” Fullscreen”, “Around Mouse”,” Web Camera, modes or you even choose “Audio Only” if you want
Region- The software record a specific area in your screen that you want
Fullscreen- The software record every activity on the whole screen
Web camera- The software Records only the webcam activities
Step 2: Start the Recording
2.1 Confirmation Prompt
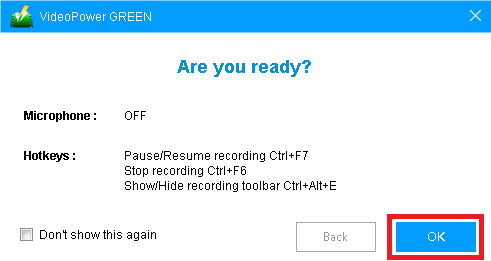
A prompt pop-up will appear on your screen after you have chosen your preferred recording mode. Click “OK” to start the recording
2.2 Annotations Feature
![]()
This may be just an optional tool for the user but it is a very useful tool for recording. While recording you can add lines, arrows, shape, text, highlights, blur, and many more. This is a great feature for every user who wants to record videos on specific details.
Step 3: Save and Check the Recording

Click the “Stop” button to stop and automatically save the video recording.
After that, the recorded video file will be automatically saved in the pointed output folder on your PC.
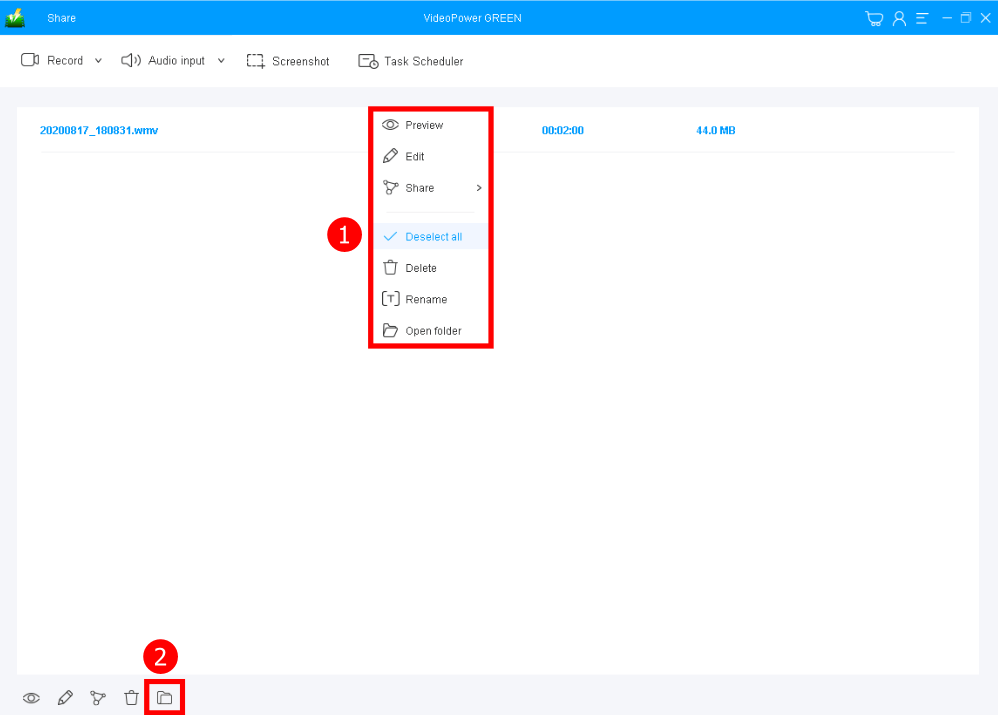
1. Finished recorded files are all listed in the main interface. To do more operations, right-click on the file name to choose.
2. Click the folder icon to view it in the pointed output folder.
Conclusion:
This is a wonderful software that has far advanced features compared to other streaming video recorders and screenshot tools. VideoPower GREEN, a powerful screen recording software that supports conversion to any video formats as well. It has a video editing function to trim video, adjust video size, change video effects, and add watermarks.
It’s a screen recorder software, screenshot capturing tool, video editor, converter, and a lot more features.
ZEUS series can do everything that VideoPower series can do and more, the interface is almost the same.
Check out NOW! Start easier with more affordable prices!
ZEUS Series
VideoPower brother products, start easier with more affordable prices!
| ZEUS BUNDLE 1 Year License ⇒ $29.99 |
ZEUS BUNDLE LITE 1 Year License ⇒ $19.99 |
ZEUS RECORD LITE 1 Year License ⇒ $9.98 |
ZEUS DOWNLOAD LITE 1 Year License ⇒ $9.98 |
||
| Screen Recorder | Screen&Audio Recording | ✔ | ✔ | ✔ | |
| Duration Setting, Schedule Recording | ✔ | ||||
| Video Downloader | Paste URL to download, batch download | ✔ | ✔ | ✔ | |
| Search/download video,browser detector | ✔ | ||||
| Music Recorder | Record music and get music ID3 tag info | ✔ | ✔ | ||
| Music search/download/record, CD Ripper/Creator, Audio Editor | ✔ | ||||
| Video Editor | Edit and convert videos, create slideshow | ✔ | |||
| Screen Capture | Capture screen, image editor | ✔ | |||