Now, no matter where you are, as long as you have a computer or cell phone, you can participate in a convenient and efficient professional conference.
The webinar is a live virtual event that is executed online. It is an educational or instructive session that includes audio and visual communication between a speaker and attendees like lectures, workshops or seminars, or other presentations.
Using it is already great but in case of offline and later viewing, how could users record webinar activities?
VideoPower GREEN or ZEUS can get this job done perfectly. It is easy to use, hassle-free, and trusted application software that enables users to record webinar seminars and meeting activities especially in Windows 10 with a professional output.
To try and enjoy this product, click the link below to download and install a free trial.
ZEUS can do what VideoPower series can do and more with an almost similar interface.
Check out NOW! Start easier with more affordable prices!
Steps to Record a Webinar
Step 1: Set sound source and secord area to record webinars
1.1 Choose a sound source
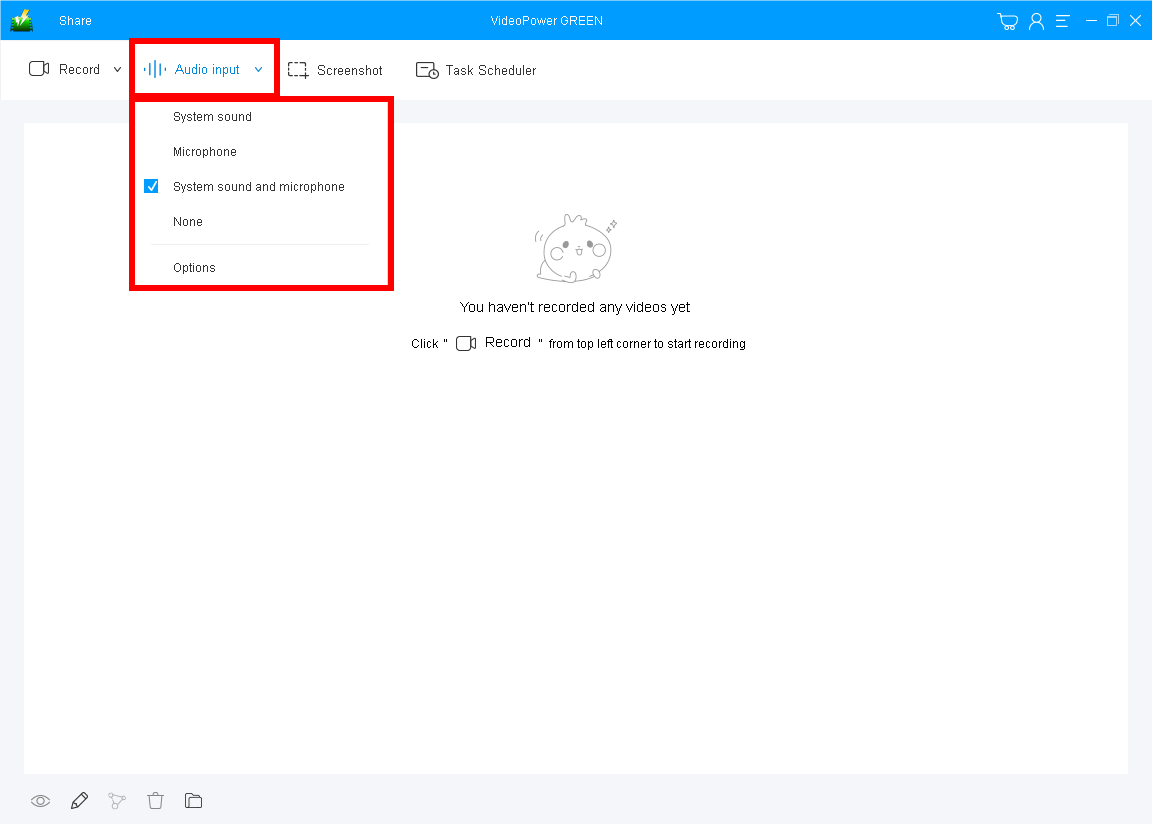
You can choose “System sound”, “Microphone”, “System sound and microphone” or “None”. To record a webinar, it is best to use “System sound and microphone” as your sound source. Choosing this option is great because not only the system sound will be recorded, your voice can also be recorded when you interact with other people present on the Webinar.
1.2 Select a recording area

Click on the “Record” button to choose the recording mode from “Full screen, Region, Audio, Web camera, Around mouse”. Select the area of the webinar you are going to record.
Step 2: Start the webinar recording
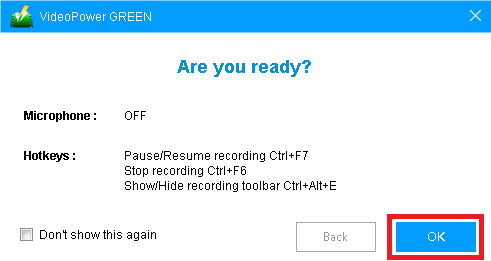
A pop-up window will appear, asking whether you are ready to start the recording. Click “OK” to confirm when you are ready to record. A 3-second countdown will start prompting you to prepare the screen.
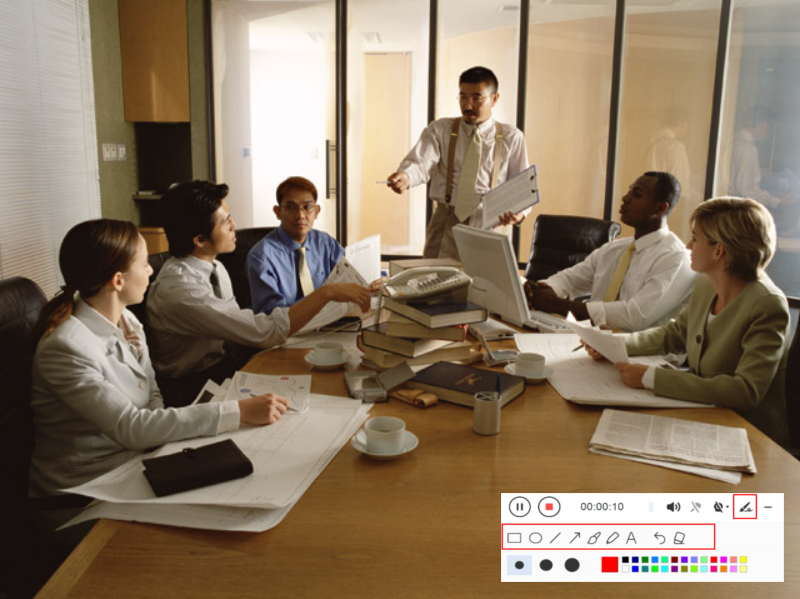
While recording you can add lines, arrows, shapes, texts, highlight, blur, etc. by clicking the edit button. This is best if you want to highlight information or just type your notes on the recording screen.
Step 3: Save and check the recorded webinar video

Click the “Stop” button to end and save the recording.
After that, the recorded file is already saved in the pointed output folder. Your recorded webinar video can be seen on the list in the main interface.
Conclusion:
Attending webinars are great because you can attend the lectures wherever you are as long as there is an internet connection. But what if you need to discuss something about the webinar with someone who hasn’t attended it? A screen recording software would be best to keep a record of it.
VideoPower GREEN, an easy to use, hassle-free, and trusted recording application software with professional features is best for recording webinar activities on Windows 10. Plus, this product has an editing feature for modifying and emphasizing video content and especially a task scheduler feature that helps you save your time and effort in recording screen activities.
ZEUS series can do everything that VideoPower series can do and more, the interface is almost the same.
Check out NOW! Start easier with more affordable prices!
ZEUS Series
VideoPower brother products, start easier with more affordable prices!
| ZEUS BUNDLE 1 Year License ⇒ $29.99 |
ZEUS BUNDLE LITE 1 Year License ⇒ $19.99 |
ZEUS RECORD LITE 1 Year License ⇒ $9.98 |
ZEUS DOWNLOAD LITE 1 Year License ⇒ $9.98 |
||
| Screen Recorder | Screen&Audio Recording | ✔ | ✔ | ✔ | |
| Duration Setting, Schedule Recording | ✔ | ||||
| Video Downloader | Paste URL to download, batch download | ✔ | ✔ | ✔ | |
| Search/download video,browser detector | ✔ | ||||
| Music Recorder | Record music and get music ID3 tag info | ✔ | ✔ | ||
| Music search/download/record, CD Ripper/Creator, Audio Editor | ✔ | ||||
| Video Editor | Edit and convert videos, create slideshow | ✔ | |||
| Screen Capture | Capture screen, image editor | ✔ | |||